Submission Tutorial
The competition has concluded and the submission platform is closed; new submissions are no longer accepted. This page is preserved as a reference for how the submission and evaluation pipeline worked.
Participants submitted their trained algorithm, along with their code and workflow, to the competition platform in their preferred programming language. They should upload the model and all necessary documents in a compressed format. The performance of their trained AI algorithm will then be evaluated against our internal test data and evaluation metric on our server. Once the evaluation is complete, the results will be sent back to the live leaderboard.
Details on the Submission Process
During the competition phase, participants will submit their trained models, along with the associated code or workflows, to the competition platform. The submission should be in the form of a .zip file, with all necessary files placed in the main directory.
It is mandatory for participants to include a submission.py Python script, which will serve as the entry point for execution. Participants should use this script to load the data, feed it into their model, and then save the output in the corresponding folder.
To ensure smooth execution and avoid dependency issues, all participants must also include an environment.yml file, exported from their Conda environment. To generate this file, run the following command:
(base)$ conda activate <env_name>
(<env_name>)$ conda env export > environment.yml
With all this in mind, your submission file should look something like the baseline example:
submission.zip
├── submission.py
├── environment.yml
├── model.pkl
├── orekit-data.zip
├── atm.py
└── propagator.py
Each submission will be evaluated on our remote server using internal test data and a predefined evaluation metric. Once the evaluation is complete, the results will be updated on the live leaderboard on the challenge platform.

This approach ensures the use of a private test dataset, protecting data privacy and preventing data leakage.
Prepare code for the submission
Input data for docker container
Your submission will be decompressed and loaded into a container inside the /app/ingested_program directory. From there, participants should focus on three relevant directories. The first is the /app/data/dataset/test directory, which contains all the input data from GOES and OMNI2. The initial states can be found in /app/input_data folder. The second important directory is /app/output, where participants should save their predictions in a file named prediction.json.
All the directories mentioned are absolute path directories. They are not relative to the current working directory. Please ensure you use absolute paths in your submission script.
Then, the directory structure is as follows:
/app
 ├── data
 |    └── dataset
 |        └── test
 |            ├── goes
 |            |    ├── goes-70000.csv
 |            |    ├── goes-70001.csv
 |            |    └── ...
 |            ├── omni2
 |                 ├── omni2-70000.csv
 |                 ├── omni2-70001.csv
 |                 └── ...
 |
 ├── input_data
 |     └── initial_states.csv # Where predictions should start
 ├── ingested_program
 |     ├── submission.py
 |     ├── environment.yml
 |     └── ...
 └── output
       └── prediction.json # It should appear after running the script
Required outputs
As previously mentioned, your submission must generate predictions and save them as a JSON file named prediction.json.
The JSON file should be saved to
/app/output/prediction.jsonin the Docker container.The output
.jsonfile should look like this:
{
    "10000": {
        "Timestamp": ["2014-01-28T00:00:00+00:00", "2014-01-28T00:10:00+00:00", ...],
        "Orbit Mean Density (kg/m^3)": [9.465688182090279e-20, 9.46567202621894e-20, ...]
    },
    "10001": {
        "Timestamp": ["2024-01-28T00:00:00+00:00", "2024-01-28T00:10:00+00:00", ...],
        "Orbit Mean Density (kg/m^3)": [9.42342342343432e-20, 9.12343453432e-20, ...]
    }
}
You can check the baseline solution to better understand how your submission should be.
The competition will be hosted on the Codabench platform, where you will need to register on the challenge’s Codabench webpage to submit your solutions. While we know you’re eager to prepare your models, here are some general details to help you get started.
Test the submission locally
It is strongly recommended that you test run your submission in the same environment where it will be executed during the evaluation process. This will help you catch any potential bugs in your code. You can download the image from Docker Hub. Use the following command to do so:
docker pull arclabmit/ai-challenges:micromamba-submission
1. Prepare dummy version of the test dataset
Download this folder containing test data (the data used in this phase of the challenge).
Move it somewhere. We will refer to this path as
LOCAL_DATA_DIR.You should end up with a path that looks like
LOCAL_DATA_DIR/test/, and directory structure like the one at the begining of this page.
2. Run the container
Open a terminal located where all resources are and run:
docker run --rm\
    --name my-test-submission\
    -v LOCAL_DATA_DIR/test:/app/data/dataset/test
    -v LOCAL_SUBMISSION_DIR:/app/ingested_program
    -v LOCAL_PREDICTIONS_DIR:/app/output
    -it
    arclabmit/ai-challenges:micromamba-submission
In this command, LOCAL_DATA_DIR points to the path where you have extracted the test data, and LOCAL_PREDICTIONS_DIR points to the location where you want to see the results once the Docker container finishes. This command will:
Mount your local data directory to
dataset/testin the container.Mount your local submission directory to
/app/ingested_programin the container.Mount your local output directory to the place where you want the results to be displayed.
This command will open an interactive shell where you can simulate the pipeline that the platform will execute. To do so, first load the environment with the following command:
yes | micromamba env create --name sub_env --file /app/ingested_program/environment.yml
Once this process has finished without errors, run:
micromamba run --name sub_env python submission.py
Note: The docker run command above uses the prebuilt arclabmit/ai-challenges:micromamba-submission image. If you built your own container instead, replace that image name with your own name and tag.
Note 2: To test GPU, you will need to install the nvidia-container-toolkit: You will also need to use --gpus all in the call to docker run.
3. Check the outputs
If the above commands finished correctly with your submission code, there should be a LOCAL_PREDICTION_DIR/prediction.json file, which is the name you used in your submission script to store your results. Open that file and ensure it is structured correctly. Once you’ve done that, you’re ready to submit your code to our servers! 🎉
Upload the submission to Codabench
The platform will guide you through this process when you visit the My submissions section of the Challenge Codabench webpage. However, we have also prepared a quick tutorial for your convenience.
First, you need to compress all your submission files together. Do not compress a folder, but select each of the items and then compress them. This will automatically generate a parent directory. Once this file is ready, go to the My submissions section, select the user submitting the file, and upload it.

You can monitor the progress of your submission on the same page. A toggle button will appear, allowing you to unravel and view the outputs your submission is producing.
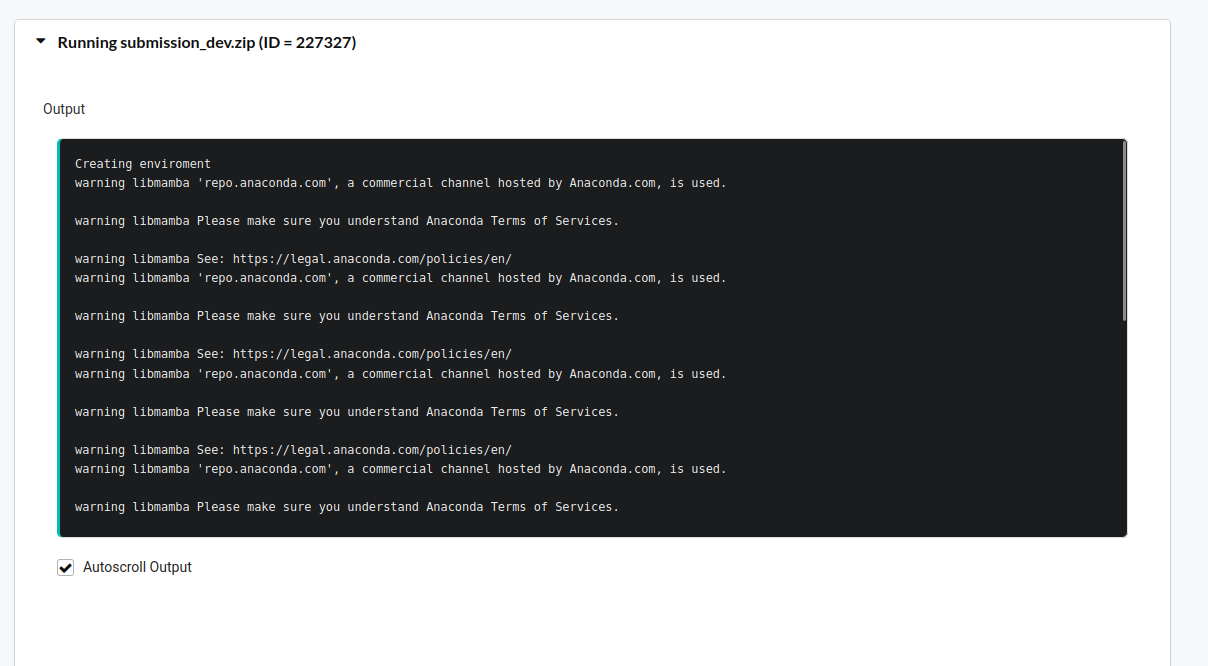
All your submissions will be compiled in the table at the bottom of the page. There, you can check whether the submission has finished or if any errors occurred.

You must upload your best submissions to the leaderboard, as this is not an automatic process. To do so, once your submission has ended and you have received a score, you should click the green table button to publish your scores.

Then, it will appear on the leaderboard.
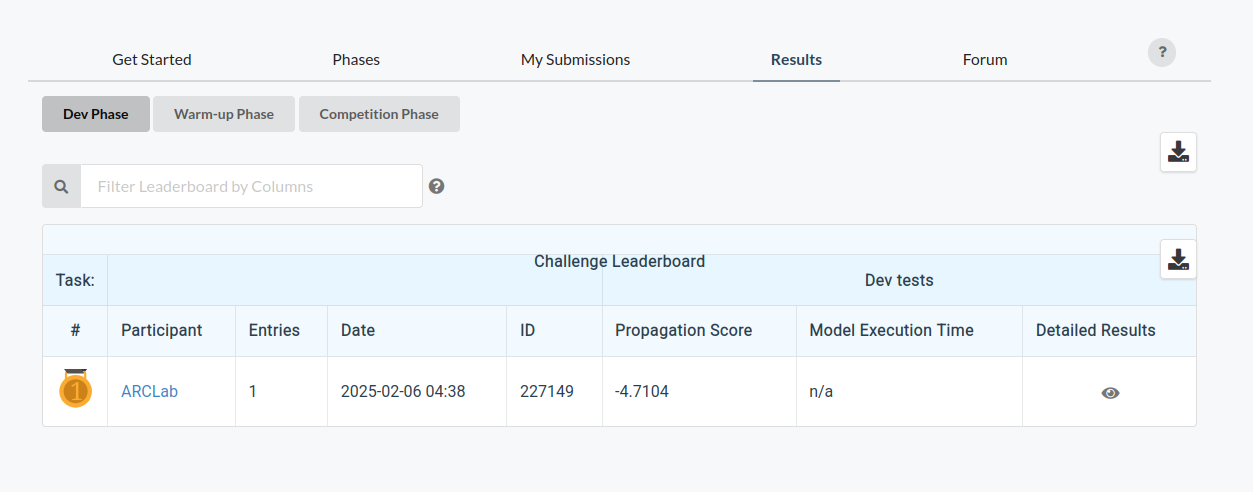
Also, by clicking the eye icon, you can see detailed results of your submission, where you can check the various outputs from the execution in the logs section.

Performance Evaluation
Once your model is running, you can evaluate it with the available data. The evaluation.py script provides a standard way to assess the performance of the models submitted for the challenge. It reproduces the public challenge metric, the Orbit-Density RMSE skill score (OD-RMSE) (implemented in the code as the Propagation Score), which measures the percentage improvement of your density forecast over the MSIS baseline with greater weight on early lead times: 1 is a perfect forecast, 0 is parity with MSIS, and negative values are worse than the baseline. The private leaderboard additionally used a storm-aware variant (SSAOD-RMSE) that gives extra weight to periods of high geomagnetic activity.
Example Usage
The run_evaluator function is the main entry point of the script and accepts the following arguments:
participant: Path to the participant’s JSON file.ground_truth: Path to the ground truth JSON file.
You can also run the script directly from the command line. For example:
python evaluation.py --participant=participant.json --ground_truth=ground_truth.json
Important information
Please take note of each of the compatibility requirements below as they are not subject to change or exception.
Computational restrictions for submissions
Hardware
The submission you make must take the following computational resource limits into consideration and not exceed them.
Computational resources: Each submission will have access to an RTX 3090 GPU for execution. The other resources (CPU, RAM, and Memory) are shared, so there is no specific allocation for them.
Run Time: Your submission should run within approximately 1 hour or less. If submissions take too long to run, they will fail.